Full Stack Development for the Agentic Coder
Agentic coding is great. All you need to come in with is a smile, some ideas, and a whole lot of figuring it out as you go to actually make something. With limited knowledge of how software development works or coding capabilities, you can spin up real, simple application in less than a day. Although most agentic coding blogs or tutorials focus on the soft skills to make it work, I want to focus on a real important factor: what are we actually building when we tell AI “Make me the greatest application to ever exist.”
When I first started agentic coding, vibe coding, whatever you want to call it, I had almost no clue how anything works. I did come in with a mechanical engineering background, and I learned Matlab and a tiny bit of Python mainly for basic logic and data analysis in a university classroom years ago, but I was scared of terminal. I never wrote anything past the point of run from the desktop application and it would give me the result there. I had no comprehension of how this backend logic can turn into something more than just a testing tool. Then I found myself with a ChatGPT subscription I was using for general chat capabilities that gave me access to Codex. I'll skip the novelty of all the bad directions I attempted building code when I started, but this subscription unlocked a new world of capabilities for me. I'm a systems guy. I love building complete end to end systems and understanding every part of it. One of biggest weaknesses is wanting to do everything that it makes it harder to become an expert in exactly one thing.
In the world of agentic coding, it unlocked a completely new system for me. Software on the outside is just the user interface that someone interacts with when they launch an application. I'll save this rabbit hole for another time, but software is just the surface level of how computers work. Computers are really cool inventions and the layers of lower level code are extremely impressive. Since all this really cool low level code and computers just work with systems other people have built, it allows developers like myself to have a lot of great structure already at my disposal. That is what is so cool about the coding world, so many great tools are available if you just know what you want and where to look for it. I digress, back to the topic at hand the system in front of my eyes. With agentic coding I can build an end to end full stack software application that not only has all these code dependencies but has outside elements like a server to host my backend, a database, and the physical app that gets downloaded on a smart phone. Within these elements we make the schema for our database, a backend system that handles core logic, and a frontend that allows the user to interact with the app. Another layer deeper is deciding what backend language you will use, what APIs are necessary to make the app work as necessary, are there any necessary middleware, what is the preferred handshake between my different systems. Each of these layers makes me dive a little deeper.
I started to understand how to build with a macro lens, but I failed to recognize how the specific parts I'm building actually function to give me my intended results. Now not every agentic coder is going to care about this because the app is working on the device that they are looking at, but to me its extremely important. It helps me recognize where are the shortcomings in the way I built the application when I first started. It helps me change my approach for future projects. It allows me to ask the right questions to the AI when I want it to build me something specific, or if I don't know the best way to make it, I can probe with the right concepts that will lead to a better structure than if it just built the way it wanted to.
Using AI to code is fantastic, but the largest drawback for a developer who fully understands the language the AI is using is the output is faster than that person can review. This may make that person take the approach not to use AI to its full capabilities or become the bottleneck slowing down development, but in my eyes, you can tailor AI to make quality, not perfect code with the right guidance. With that being the pre-conceived thought, that means I don't want to focus on code review, which means I don't need to understand the syntax of any language I'm trying to code with, but I do need to understand logic. I need to understand why when I do something on the frontend, it works or doesn't work on the backend. If I send a get request from the frontend and it reads back the correct failure error for that get, that most likely means my backend code needs to be fixed or something further downstream is broken. It will help me take a more active part in the eventual debugging.
This is why I decided to do this project. The project is rather simple create a web app that uses Python on the backend, JavaScript and HTML on the frontend and communicates through HTML ports using JSON. This was critical for me because I was learning about routes and services that are used when node.js is on the backend and how the route is essentially the navigator while the service is the core logic. The route might take you through middleware, send things to external services through APIs and run the core logic and either return a Get, Post, or another communication. I wanted to build this out for something that seemed relatively easy to build the logic for and had two way communication between the backend and frontend. So I made a high low guessing game that requires a post from the frontend and it would request the backend with the post and the backend would do its logic and return what the frontend is asking for. This exercise was both a test on my ability to make a clean repo myself from the skills I've developed over the past few months as well as test my ability to take a simple framework and adjust it to output different results. The tutorial I'm giving is on the third version of this simple app I have made after playing a little further with the code and customizing it myself. I did have help producing the initial blocks since I never worked with JavaScript or HTML before but added in custom blocks using the learned syntax after the initial project was finished.
My Approach For This Project
As you have probably already gathered I am not a software engineer by training nor is it my goal to become a traditional software engineer. However, I do want to understand what it is I'm using especially if I want to be part of large projects where a major engine of it is software. Before explaining my approach I want it to be clear, my first version was slightly different than the tutorial I am sharing. The tutorial I am sharing is how it would look if I did it right the first time. Like all projects I start nowadays, I went to my local LLM and laid out my goals. “I want to understand the ways in which my backend, middleware, and frontend communicate with each other. I want it to be a very basic program that simply utilizes a backend python file to generate a random number and through a typescript frontend displays it via a local hosted webpage. What do I need to do to get started.”
Now you may be thinking that what I just described there was the project I made, but just like I always do, I realized I was actually way more in over my head because I didn't understand the small, but real difference of TypeScript compared to JavaScript and needing a compiler to translate it to JS (not a big deal, but needed an extra package to accomplish this). I also didn't give myself an opportunity to engage with a post, which is very essential to fully understanding the two way communication stream between the frontend and backend. So instead of showing you the long, windy road that got me to where I ended up I'll explain it shortly and then show you the clean route I would take if I did it over again.
I like to start off projects clean, so I typically make a new directory in this case I named it ran-num and right after it was setup I did git init. Then while in terminal I like setting up my file structure, less so because it is easier than doing it there than in vsCode, but just to get more familiar with terminal. So, I setup my scaffolding. I made two directories in ran-num: backend and frontend. In backend, I made two empty files main.py and requirements.txt. In the frontend, I made a src directory with main.ts and style.css, index.html and package.json. Before setting up my virtual environment I started writing the code for the main components I thought about and yes this was with help, but the goal wasn't to learn the syntax of these languages but what their specific function is and how they communicate with one another. I filled out main.py, main.ts, and index.html, and had no clue what to do with those extra files. At this point I also made my virtual environment and downloaded the FastAPI package to it. Now with everything in I asked my little ai helper, “hey I put this all in, but how do I actually run it. I also have a few empty files.” It let me know I need to freeze the requirements from the python environment and I actually need vite, which means I need to download node.js to my laptop. So I proceeded with doing that, it added in a ton of unnecessary files when all I really needed from it was to compile the TS to JS. Then I hit run on the backend and frontend and likely with a few syntax issues from my inability to copy and paste code (I manually typed to live a little more what I was copying) it started to run and I can hit a button and it displays a number. That was great except it missed some key components of what I was trying to accomplish. I also realized if I really wanted to know how to make this work, I would need to come up with some code myself. I don't want to take too much credit, but I did come up with the most ultra basic python core logic for the new game I built: higher or lower.
Simple Full Stack Development Tutorial
What I want to do now is switch tones, I was going through this as my personal experience, but I also want this document available as a resource for those getting into agentic coding, but don't necessarily know how software works and wants to spend some time understanding what the AI is doing. I'm going to approach this as a tutorial aimed not only to tell you exactly how to do it, but put in enough explanation so that if you ran into one setback or another, you would be able to understand what happened. My approach may not get the industry golden approval, but its come a long ways from the messiness of my old development. I'm going to proceed with making a new project from scratch using this exact methodology shown. Only differences might be I don't need to redownload any specific packages that my mac already has.
Okay I want to layout the very simple structure we are going to be operating. We will need a python virtual environment, a backend, and a frontend, that is it. The virtual environment is what lets you run python scripts on your mac/pc. The reason we use a virtual environment instead of a system environment is its cleaner to download the exact packages you need for a specific project within the project's virtual environment. If you don't do that the system environment can get messy with different versions, dependencies, etc. The backend is the core logic, in very simple applications like this one, you could potentially have it all sit on the frontend, but for the purposes of understanding handshakes we will make a dedicated backend. A handshake is when two systems agree on how to communicate with each other. So a typically application has the user interface which is the screen you look at. When you press a button, this sends a request from the frontend to the backend to do something. The backend completes this behavior, then sends the output back to the frontend to display. This is only possible if each layer has agreed how it is going to communicate with one another. The frontend is what the user sees and what establishes communication with the backend. The simple framework of communication is through http requests and json bodies. There are tools that help read the http and json and allows the json to be parsed for the frontend or backend. .gitignore just ensures certain files get ignored from being saved to git.
Repo Layout
Now that how the system works is established, lets go over the exact repo structure.
-> guessing-game/
    -> .venv/
    -> backend/
        -> main.py
        -> requirements.txt
    -> frontend/
        -> script.js
        -> style.css
        -> index.html
    -> .gitignore
Prerequisite Downloads
Before we begin doing anything I want to ensure all the necessary pre-requisites are downloaded that are needed to build this repo. Since I'm working on mac I will be giving the exact instructions of downloading for mac, but if you are on windows its a very similar process, just search how to do it on windows for the different elements I instruct to install. The first thing you need is a package manager. This is what helps us install programs to our device easily from terminal. On windows I believe something like winget or curl works, but on mac we will use homebrew. Your first step is to open up terminal and paste this command
/bin/bash -c "$(curl -fsSL https://raw.githubusercontent.com/Homebrew/install/HEAD/install.sh)"This will download homebrew and allow you to brew install other applications. Next we will actually download another terminal app that is a little better for our purposes. Git for repo management. We will also download visual studio code for better code visualization, and python since that is what our backend operates on.
brew install --cask iterm2
brew install git
brew install --cask visual-studio-code
brew install pyenv
pyenv install 3.14.5
Building the Scaffold
Since I want you to start getting more familiar with terminal we are going to do a lot of this via terminal commands to setup the repo. The only differentiator between mine and yours may be where I decide to setup my repo folder. I have a system that works for my development, but you can simply put it under your home folder. I also want to note my goal is not for you to clone this repo, but to do this yourself in your own local development cycle.
Make the project repo. Be sure to be in the current folder you would like it to be in. To navigate folders use the following commands. cd allows you to go into a specific folder and is used for file direction. ls lists all the folders and files in a specific directory. cd .. brings you back up one level. cd ~ brings you back to home. cd ~/ takes you to any directory in the computer not only child folders. mkdir makes a new folder in a path. touch makes a new file in the folder. We don't use this, but nano allows you to edit a file in terminal. git init initializes git management within a directory. Now I will take you on the exact journey in terminal I did to begin my repo.
user@User-MacBook-Pro ~ %
user@User-MacBook-Pro ~ % ls
Documents Desktop Downloads Development ...
user@User-MacBook-Pro ~ % cd Development
user@User-MacBook-Pro Development ~ % ls
apps
user@User-MacBook-Pro Development ~ % cd apps
user@User-MacBook-Pro apps ~ % mkdir guessing-game
user@User-MacBook-Pro apps ~ % cd guessing-game
user@User-MacBook-Pro guessing-game ~ % git init
user@User-MacBook-Pro guessing-game ~ % mkdir backend
user@User-MacBook-Pro guessing-game ~ % mkdir frontend
To create this virtual environment from your project repo run this. Your venv is called .venv in this case. The . keeps the files hidden and they don't get read by git.
user@User-MacBook-Pro guessing-game ~ % python3 -m venv .venvNow if you ever want to activate this virtual environment it is done by simply this line of code. It switches to the virtual environment shell and activates the venv. bin stands for binary.
user@User-MacBook-Pro guessing-game ~ % source .venv/bin/activateWe will also download the python package of fastapi. I will talk more on this later, but downloading the package allows us to use another well made python toolset that will make doing what we want to do much easier without needing to replicate code unnecessarily.
(.venv) user@User-MacBook-Pro guessing-game ~ % pip install "fastapi[standard]"After install we will deactivate the virtual environment
(.venv) user@User-MacBook-Pro guessing-game ~ % deactivate
user@User-MacBook-Pro guessing-game ~ % cd backend
user@User-MacBook-Pro backend ~ % touch main.py
user@User-MacBook-Pro backend ~ % cd ..
user@User-MacBook-Pro guessing-game ~ % source .venv/bin/activate
Pip freeze writes in the current requirements from our python environment this allows other users who are trying to do the same thing download use this file to download any missing libraries to their python environment using pip install -r requirements.txt
(.venv) user@User-MacBook-Pro guessing-game ~ % pip freeze > requirements.txt
(.venv) user@User-MacBook-Pro backend ~ % deactivate
user@User-MacBook-Pro backend ~ % cd ~/Development/apps/guessing-game/frontend
user@User-MacBook-Pro frontend ~ % touch main.ts
user@User-MacBook-Pro frontend ~ % touch index.html
user@User-MacBook-Pro frontend ~ % touch style.css
user@User-MacBook-Pro frontend ~ % cd ..
user@User-MacBook-Pro guessing-game ~ % touch .gitignore
user@User-MacBook-Pro guessing-game ~ % git status
View the current folders that have been edited
user@User-MacBook-Pro guessing-game ~ % git add .Stages all files
user@User-MacBook-Pro guessing-game ~ % git statusVerify the files look right that are getting committed
user@User-MacBook-Pro guessing-game ~ % git commit -m "Set up initial scaffolding for the app"Building the App
Now the app is ready for development. The idea is to stage and commit files in a logical sequence that way if later changes are harmful to the app it can be easier to view through the commit history what the different commits do. Since this is a simple app I will not be making any branches or worktrees, but these are great tools to use to ensure the core product is protected from potential harmful code. I'd recommend doing commits along the way when you have a major code change that improves the file from the last commit.
Wow we did so much and haven't written a line of code. Now is the fun part. Making the actual app. I've noticed that a lot of building is all the scaffolding and how different parts connect to one another. The more of this that is figured out ahead of time the smaller the headache as you begin building. However, unless you have a shoebox application, it is very likely the app may grow in unexpected ways. Especially if you are like me and have an endless upgrade thought process using agentic coding.
Okay so what I want you to do now is open up vs-code and press file -> open folder -> select your repo folder in my case the folders until I get to guessing-game.
Backend
Now I am going to provide you with my backend code with comments on what each thing does. The key thing to realize is that elements from one file connect to the next through the handshakes I mentioned before. You can simply copy and paste this into your empty main.py file.
# All these imports take pre-written functions/scripts from a library
# that has been installed on Python and importing it for use within this script
from fastapi import FastAPI # reads and parses HTTP requests from frontend
from fastapi.middleware.cors import CORSMiddleware # Defines which frontends are allowed to read responses from backend
from pydantic import BaseModel # Defines the expected JSON shape
import random
# Creates an application object from the FastAPI class.
# This allows for the class scaffolding to be filled and certain functions to be called that are in FastAPI
app = FastAPI()

# There is already an empty middleware class and now we are defining what goes inside it
app.add_middleware(
    CORSMiddleware,
    allow_origins=["http://localhost:5173"],
    allow_methods=["*"],
    allow_headers=["*"],
)

# This creates a new class that defines the expected JSON shape
class RequestData(BaseModel):
# When sending the request from JS, it needs to use the same variables
    num_guess: int
    select_input: str

# The home() definition is creating a function and it gets registered by FastAPI to the route /home in our app object
@app.get("/home")
def home():
    return {"message": "Backend is running"}

# This creates a new post route in our app /random
@app.post("/random")
# In the function FastAPI sees the incoming data being sent and knows to assign it to the request variable
# RequestData is the class that tells the system what shape its supposed to be saved
# This allows us to save the input to specific variables for the function logic
def random_number(request: RequestData):
    num_guess = request.num_guess # needs to be same as expected var names
    select_guess = request.select_input
    ran_num = random.randint(1,100) # Creates a random number between 1 and 100
# Core app logic to determine if the number is higher or lower
    if select_guess == "higher":
        if ran_num > num_guess:
            response = "You Win!"
        elif ran_num < num_guess:
            response = "You Lose"
        else:
            response = "It's a tie"
    else:
        if ran_num < num_guess:
            response = "You Win!"
        elif ran_num > num_guess:
            response = "You Lose"
        else:
            response = "It's a tie"
# The output that gets converted to JSON by FastAPI to send back
    return {
# The variables number and result are what get used by JS to read in the value
        "random_number": ran_num,
        "result": response
        }
So I want to explain some major elements to the best of my ability. We use a package we downloaded to python called FastAPI. What FastAPI does is it reads http requests and parses out the json into a usable format for python to use. This allows us to assign necessary inputs and outputs to python variables and later communicate back to the JavaScript file. app = FastAPI() Lets us use the class scaffolding (think of it as memory storage) and functions already setup by FastAPI for our specific purposes. We will be filling in this application with our relevant data and using the functions to communicate with our frontend. The middleware is essentially letting FastAPI know where we will accept getting information from, in this case our specific frontend communication protocol. I won't be going into great detail, but there are a few means to communicate between frontend and backend. Gets and pushes are the most common ones. A get simply means it is requesting information tied to a specific route. In my example, there is a get("/home"). This means that the frontend is asking for whatever home provides, it isn't giving any inputs. A push on the other hand sends over information to influence the output or store memory. So in our case there are two inputs that the function we made uses to influence the output. When you see def/return this means we are running a python function. Inside the function is where we have the logic to influence the output. Look at the return in the push request and remember the variables, you will see they have matching names in the JavaScript file. There are other elements in here, but these are the most critical to understanding what our backend is doing.
Frontend JavaScript
Next, we will look at the frontend JavaScript file.
/*
The javascript file is the middleman, it is what performs most of the frontend
app logic and send only the final result to the html file, it also communicates
with the backend to do the core backend logic and send the result back to the frontend
it feels a little bit like the middleman between the two and is the file that needs the
most caution with variable names

This sets up the connection between the HTML script and the JS
It searches for the id=generate or id=output in the HTML file and then
assigns it to a variable in the TS file
*/
const numGuessInput = document.getElementById("numGuess"); // user input for number they are guessing
const playButton = document.getElementById("playButton"); //button that lets the TS file know its supposed to POST to the backend
const numberOutput = document.getElementById("numberOutput"); // output from backend that gets loaded in to frontend
const resultOutput = document.getElementById("resultOutput"); // output from backend that gets loaded in to frontend
const home = document.getElementById("home");
const homeOutput =document.getElementById("homeOutput");
/*
This now listens to the play button action on the HTML page, when it receives an
input it will now engage with the backend. We create a new variable called
response that saves what the backend FastAPI sends over through an HTTP
response object. Data then parses out the specific JSON response
*/
playButton.addEventListener("click", async () => {
/*
This saves the two inputs under constants. It knows what number was guessed
and saves it to numGuess as a number. It also knows which option higher or
lower is checked and saves that value to orderGuess. This stays as a string
*/
  const numGuess =
    Number(numGuessInput.value);
  const selectedOption = document.querySelector(
    'input[name="select"]:checked');
  const orderGuess = selectedOption.value; // saves the value of higher or lower to this variable

// Sends over the post in html to the backend and awaits the response
  const response = await fetch(
    "http://localhost:8000/random",
    {
        method: "POST",
        headers: {
            "Content-Type":
                "application/json"
        },
        body: JSON.stringify({
            num_guess: numGuess, // Same variables as py file
            select_input: orderGuess
        })
    }
  );
  const data = await response.json(); // waits for the response from the backend
// Saves the outputs to the variables that the HTML file reads. data.xyz the xyz is the same variable as python
  numberOutput.textContent = `Random Number: ${data.random_number}`;
  resultOutput.textContent = `Result: ${data.result}`;
});
// This was just an additional section I did for my own learning
home.addEventListener("click", async () => {
   const homeResponse = await fetch("http://localhost:8000/home");
   const status = await homeResponse.json();

   homeOutput.textContent = status.message;
});
So the key thing to note here is that the JavaScript file is the middleman between the exact display html file and the backend. As you dive deeper into coding, you will learn there are frameworks such as react that combine this all into one file called a .jsx file. It allows for easier to understand code since you do not need to read all the elements as variables inside the JavaScript file since it exists natively in jsx. Some things to note here is that the various inputs and outputs from the html get loaded as variables into this file, and then it sends a request to the backend for something. When a button gets clicked, it triggers the request until it hears the response. Once it hear the response it saves the response to the html file to load on the web browser.
Frontend HTML
Now the last thing you need is the html file to have a working application. I will also briefly go over the style file so you can modify how things look.
<!doctype html>
<html lang="en">
  <head>
    <title>Guessing Game App</title>
    <link rel="stylesheet" href="style.css">
  </head>
  <body>
    <h1>Guessing Game</h1>
    <label for ="numGuess">Guess a Number(1-100): </label>
    <input
        id="numGuess"
        type="number"
        value="50"
    />
    <br><br>
    <div>Now guess if the random number generated will be higher or lower than your inputed number</div>
    <input
        type="radio"
        id="higher"
        name="select"
        value="higher"
        checked
    />
    <label for="higher">Higher</label>

    <input
        type="radio"
        id="lower"
        name="select"
        value="lower"
    />
    <label for="lower">Lower</label>
    <br><br>
    <button id="playButton">Play</button>
    <div id="numberOutput"></div>
    <div id="resultOutput"></div>
    <h2>Just Another Lil Tool</h2>
    <button id="home">Status</button>
    <div id="homeOutput"></div>
    <script type="module" src="/script.js"></script>
  </body>
</html>
Now I didn't comment on this file since it is a little cumbersome on syntax for commenting, but there are a few important things. One the id is what gets read in the js file, so when you write that in it needs to match what is written here. <div> is simply just a place for text to be displayed. <br> creates a break in the page. input allows us to create an input. Checked just means which value is checked before anyone touches anything. The big thing is making sure the script points to your js file and the name matching. This is what allows us to execute frontend logic. The file looks weird but is relatively intuitive.
Frontend Style
The last little thing is the style.css file, this file allows you to change the html style. Play around with it, its very intuitive, but I'm sure if you want to go fancier, it may require learning a bit more.
#playButton {
    background-color: blue;
    color: white;
    font-size: 20px;
}

h1{
    font-size: 40px;
    font-weight: bold;
    color: darkgreen;
}
label{
    color: darkorchid;
    font-size: 20px;
}
#numGuess{
    font-size: 15px;
}

div{
    color: darkgoldenrod;
    font-size: 20px;
}
Running the Newly Built App
Now that you have all the elements you get to actually see the creation, what you need are two instances in terminal so open up iterm2 and press command + t. Navigate to your folder guessing-game in both of them and activate the venv. Then in one navigate to the frontend and the other navigate to the backend. In the frontend you should run this. It opens up the frontend web server and communication
python3 -m http.server 5173Now go on your web browser and type in
http://localhost:5173In the backend run this. It opens up the backend host. uvicorn is a python package, main is your main.py and app is your app = FastAPI(). If these have different names use them instead.
uvicorn main:app --reload --port 8000As a little check that the backend is working you can type
http://localhost:8000/homeit will display this
{"message":"Backend is running"}You can also check out the specific get and post on the backend without needing the frontend working. This is a good way to verify backend logic even if frontend parts are mapped incorrectly. Another useful tool is the /docs route, you can put in values that the backend typically receives from the frontend and see if the actual app logic works.
http://localhost:8000/docs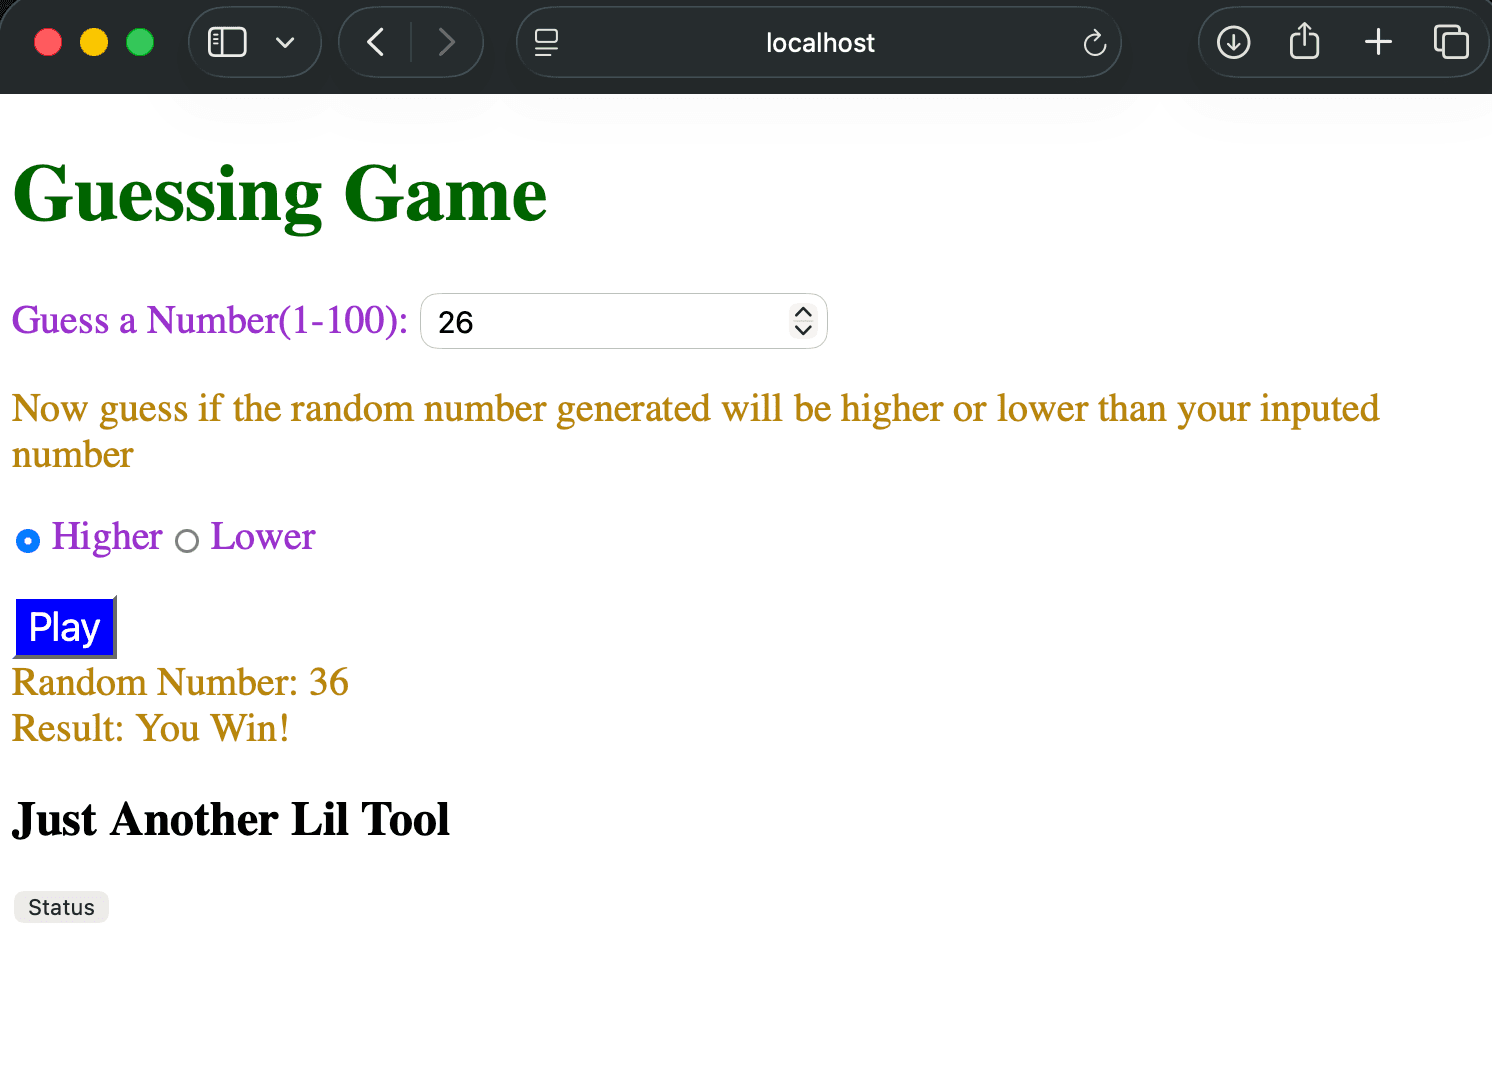
Concluding Notes
Now, if you are like me I'd imagine you messed up somewhere in the middle, or still don't fully understand a specific aspect, so I encourage you to attempt debugging this using the resources you have available: ai, google, and youtube. If you completed this following my exact steps, then congrats, try changing certain parts of the app to do different things. This is the best way to learn. After setting up my one way stream of information with a get, I decided I wanted to try it with a different route. Its very difficult to learn code completely from scratch, but it is very easy to learn how to modify code for your intended purposes. The goal of this project was not to make some glamorous app, but it was to learn how a basic application works and be able to modify an existing template to something completely different with this newfound understanding. There may be more learning elements such as you want a text input instead of number input, but that is just syntax, the goal is to learn how a full stack application works at its most basic element. My next project is going to be focused on using agentic coding with our exact knowledge to build out something more fun and interesting without breaking any frontiers.